Game-Ready Voxel Meshes with Low-Cost AI
2026-02-22
10 minute read
While I was working at Rec Room, my team and I ran several experiments integrating AI into game development. Most of them failed, but one stood out as effective: using AI to generate meshes. The meshes we generated were rough, with discontinuities and artifacts, but the games we built were charming.
In my free time, I kept pushing on the idea and eventually found a way to remove the underlying artifacts while preserving the charm by leaning into a voxelized style. With this approach, I can put together a scene in about two hours:
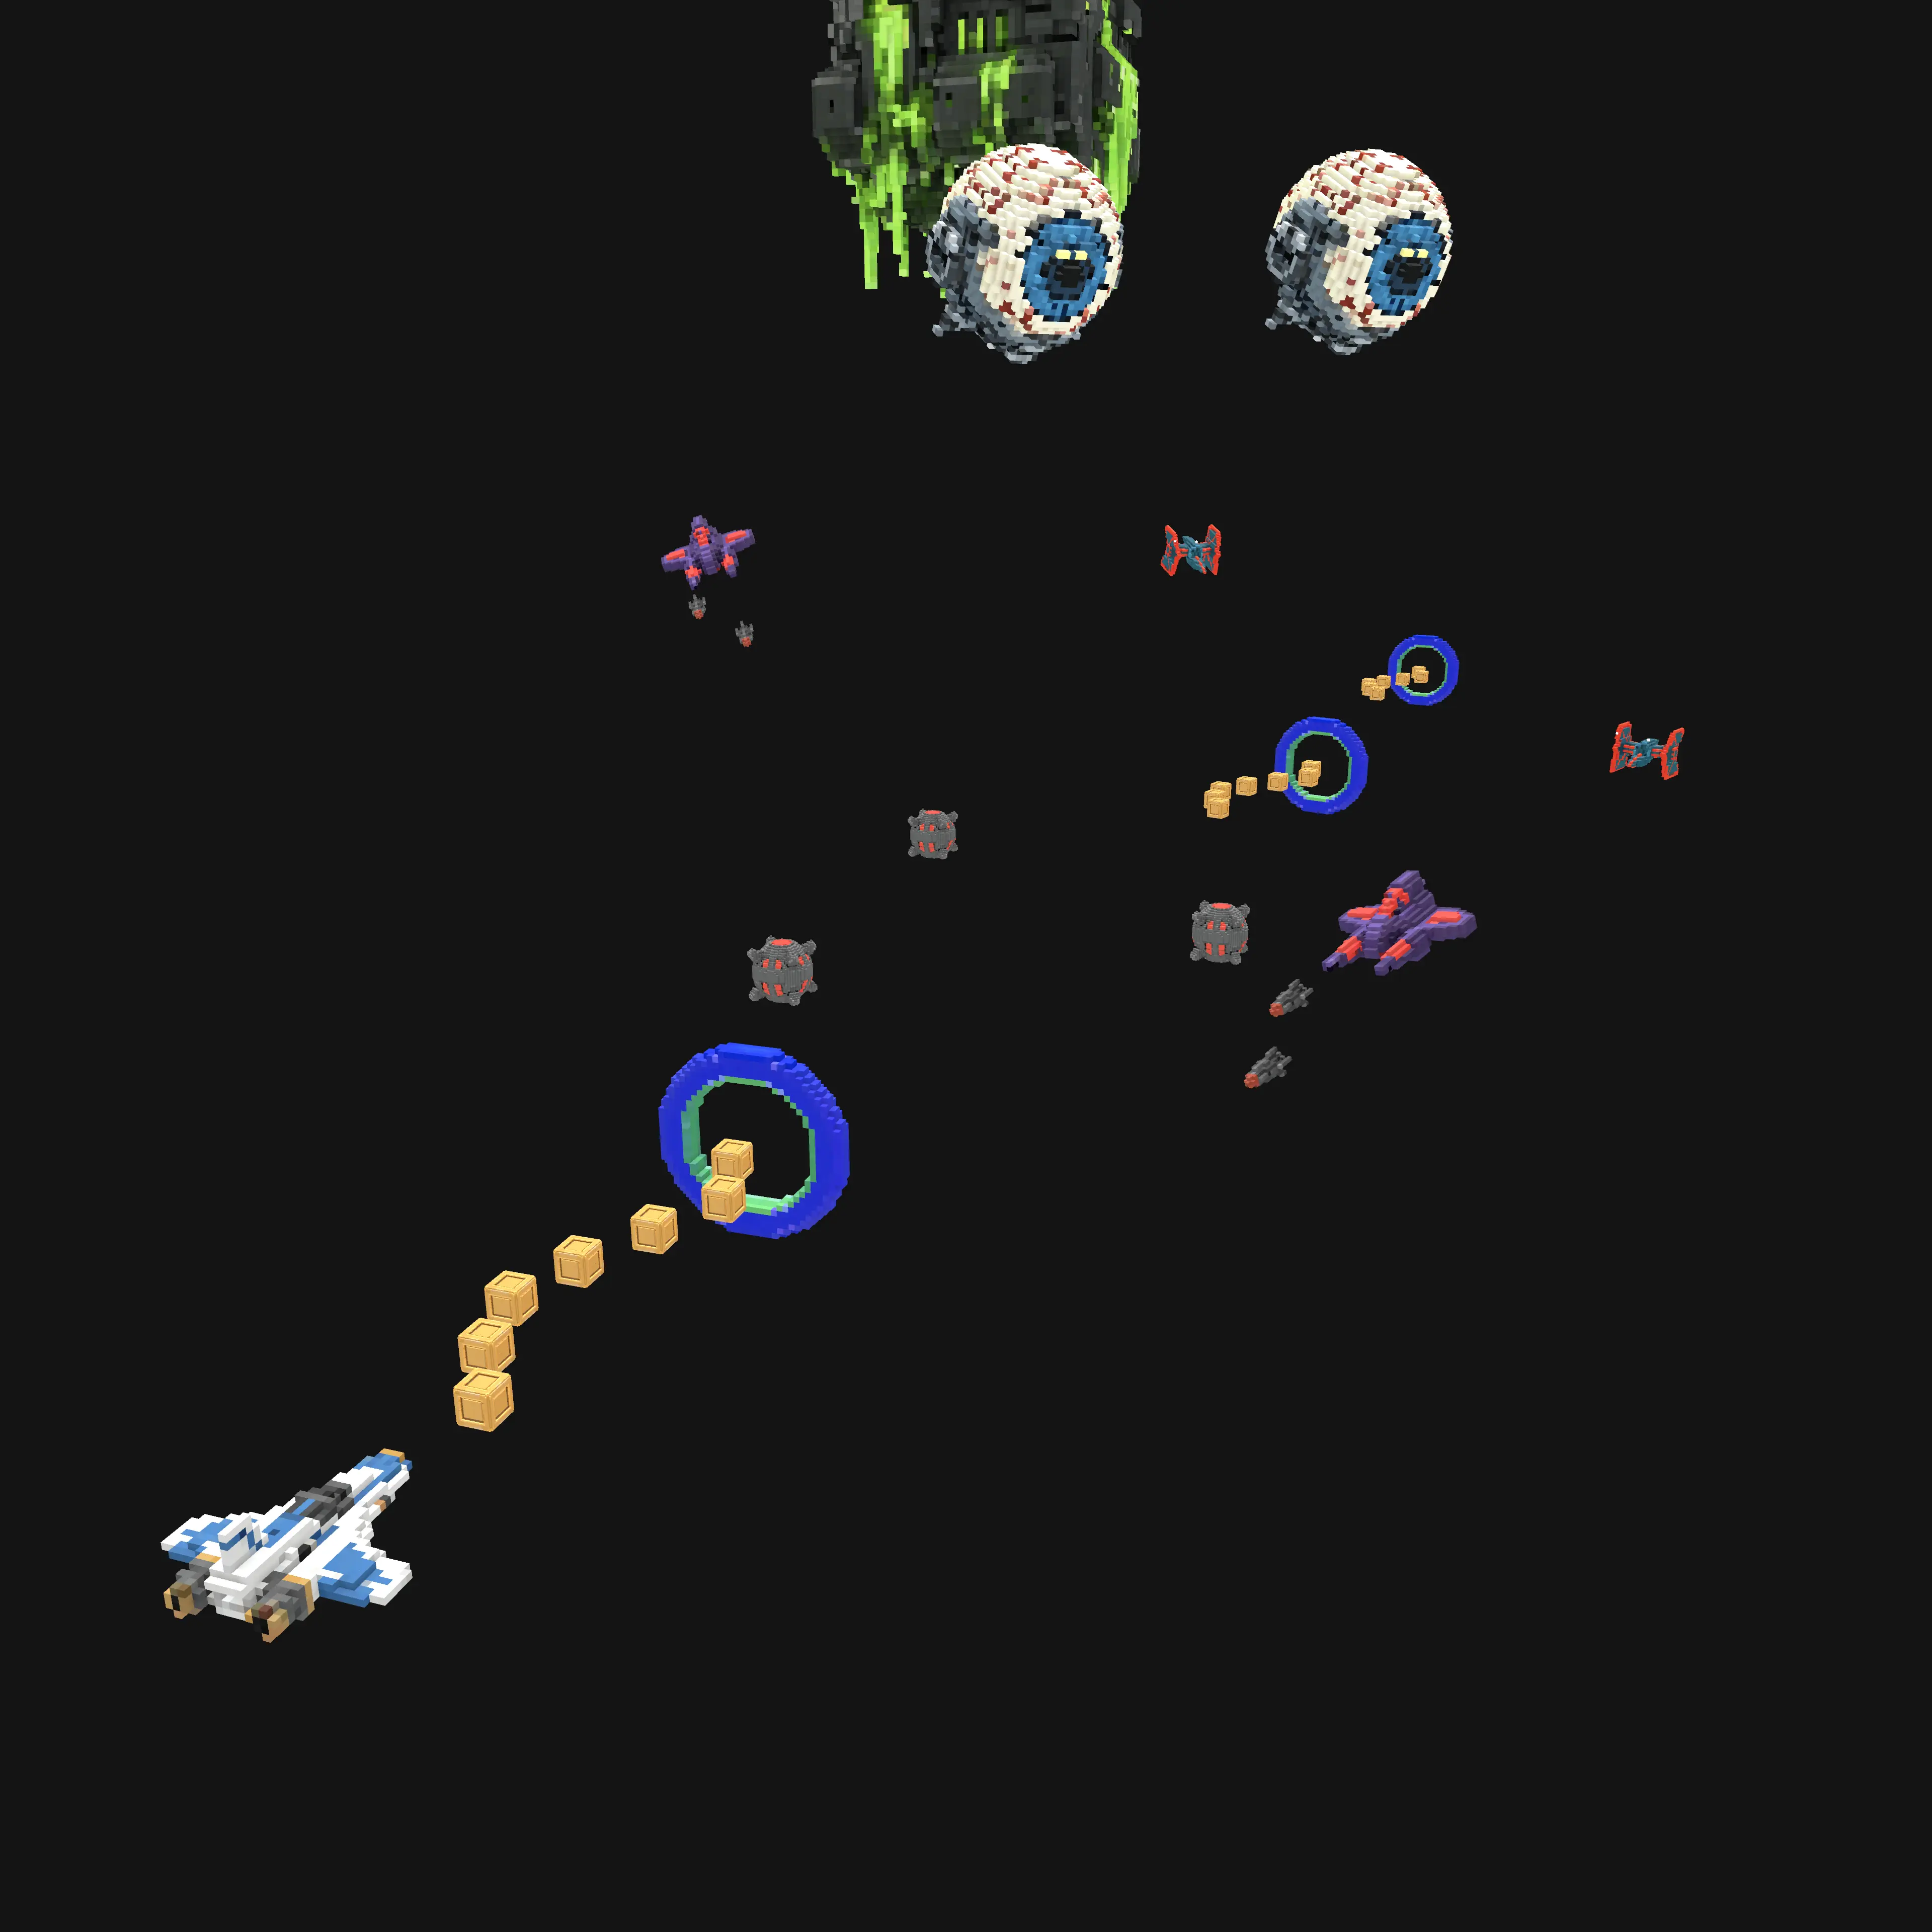
I liked the result enough that I decided to build a game using this technique. I'm calling it Star Shift.
I'm having a lot of fun with this pipeline, and in this post I'm sharing it so others can have fun too. It's a multi-step process with a few sub-steps. I'll cover each step in detail, but here's a table of contents if you'd like to jump around:
Mesh generation is a two-step pipeline: create a source image, then convert it to geometry. The quality of the source image has an impact on the resulting mesh, so it's worth iterating on your image-generation process until you're getting consistently good results. Once you have a solid source, you can feed it into a mesh-generation tool to produce a 3D model.
Input quality compounds through the pipeline, so it helps to keep a human in the loop. By passing judgment at key stages, you can catch low-quality results before they magnify downstream. This is especially useful when you're trying to conserve tokens or maintain a cohesive style.
Many mesh-generation services include built-in image generation, but those options are often more expensive and offer less control than generating images separately and importing them into a mesh tool.
At the time of writing, I generate my source images with ChatGPT. I tried several models (including Nano Banana Pro / Gemini 3 Pro Image), but I've gotten the best results from the GPT models. I usually leave ChatGPT on Auto, which typically selects GPT-5.2.
Good source images come from a good prompt. Spend some time iterating on the prompt, then reuse it once it reliably produces mesh-friendly outputs. Short prompts tend to work best, and these details are important to include:
- Orthographic view
- Pure black or pure white background
- Centered subject
- No distortion
- Optimized for mesh extraction
I go back and forth, iterating on a prompt and generating images, until I like what I see. Here's an example of a prompt I landed on:
You are generating concept images for my 3D arcade space game Star Shift. Use an orthographic top-corner view on a pure black or pure white background. Keep the model centered and avoid perspective distortion. Maintain a clean, readable 3D arcade aesthetic suitable for mesh extraction. Favor solid shapes and simple lighting, and avoid anything that looks flat or heavily outlined.
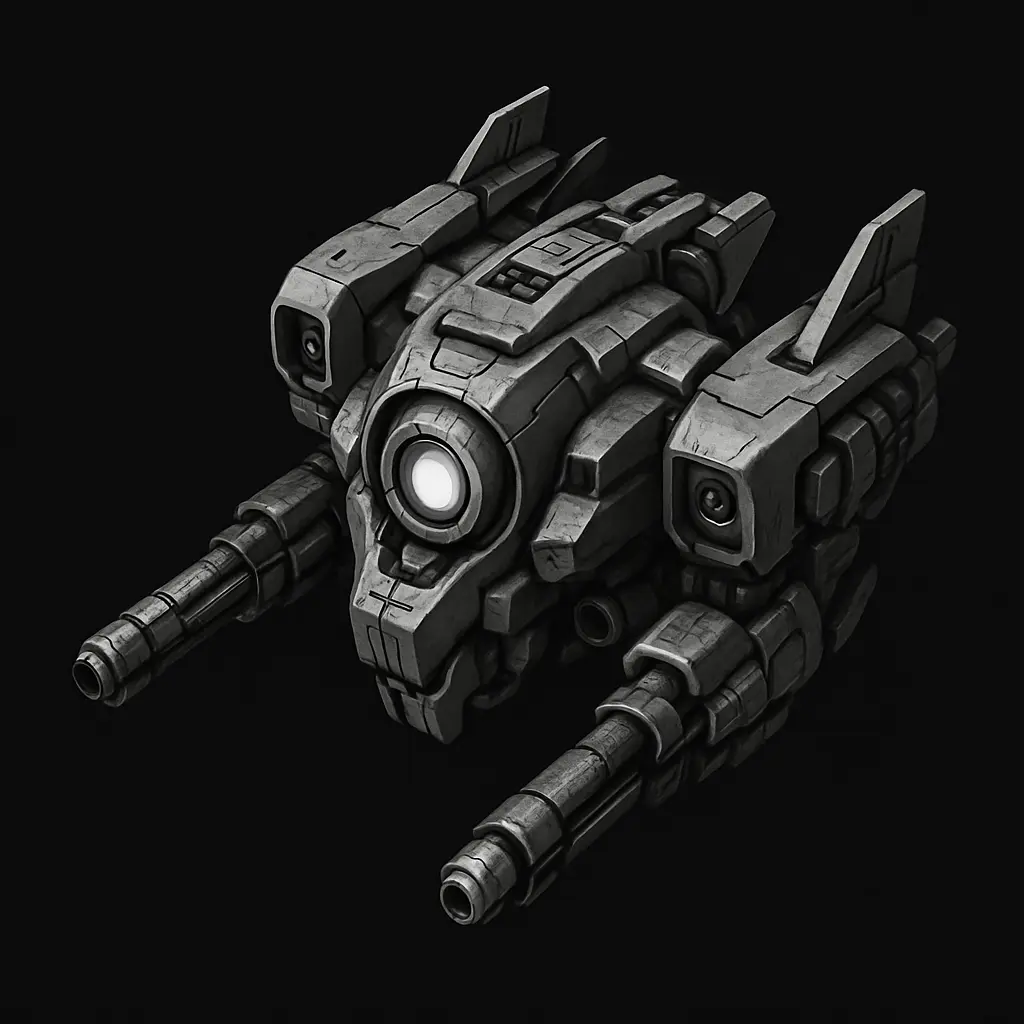
Once I have a prompt I like, I turn it into a custom GPT. Here's a link to the GPT I use for Star Shift. A GPT like this can generate great images from just a few words. For example, "a robotic enemy ship" produced this image:
For different environments, you'll want cohesive asset sets that share a visual style. After generating an initial image, I feed it back into ChatGPT to extract a reusable style prompt.
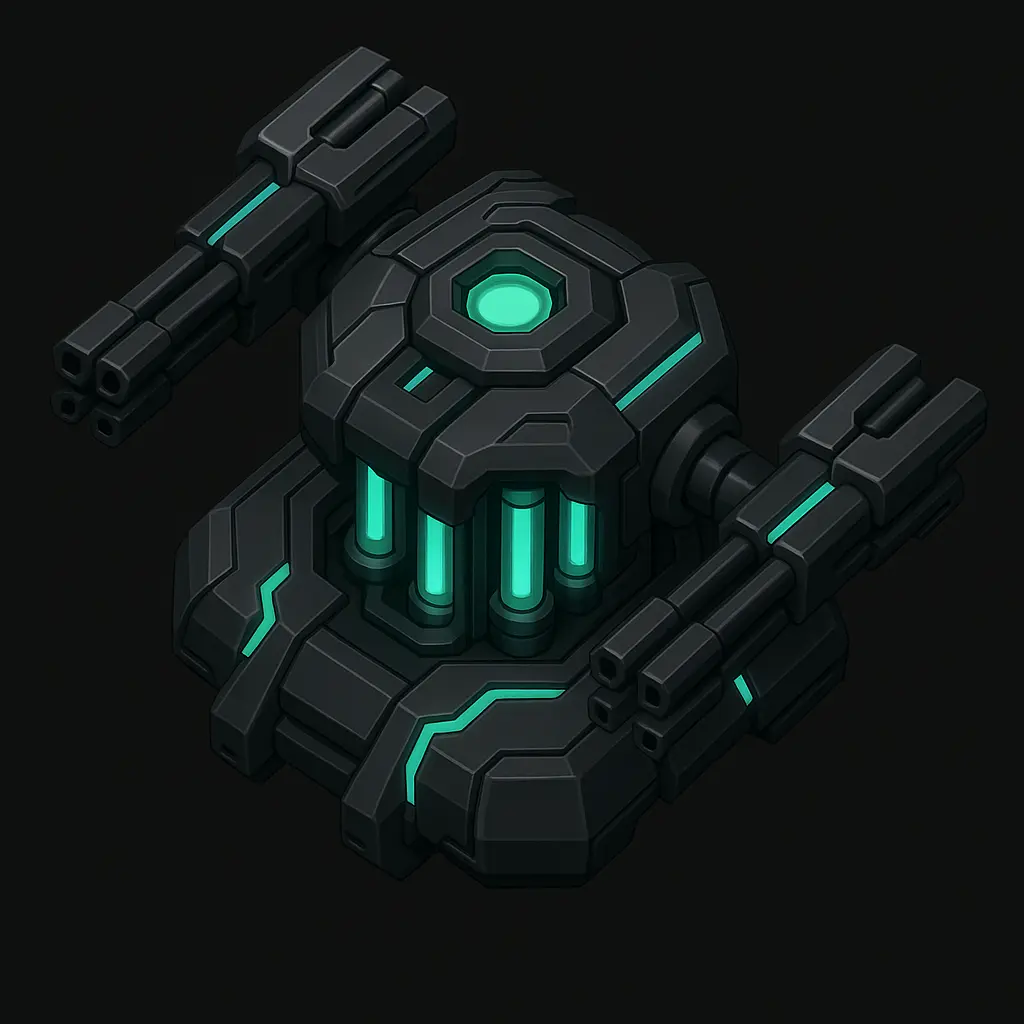
For example, I wanted energy-themed assets with clear reactor tubes. I generated an initial image I liked, extracted a prompt, and iterated until I landed on this:
Stylized arcade-sci-fi mechanical design. Dark brushed metal plates with beveled edges and crisp panel lines. Integrated bright green/teal emissive circuits and reactor tubes. Clean hard-surface modeling, chunky geometric shapes, readable silhouette, simple lighting, no grime, no painterly texture. Looks like a futuristic industrial machine powered by glowing energy cores.
My workflow for generating a library is:
- Select my custom GPT
- Paste my style prompt
- Write a subject line for a specific asset
Here are some examples with their subject lines:

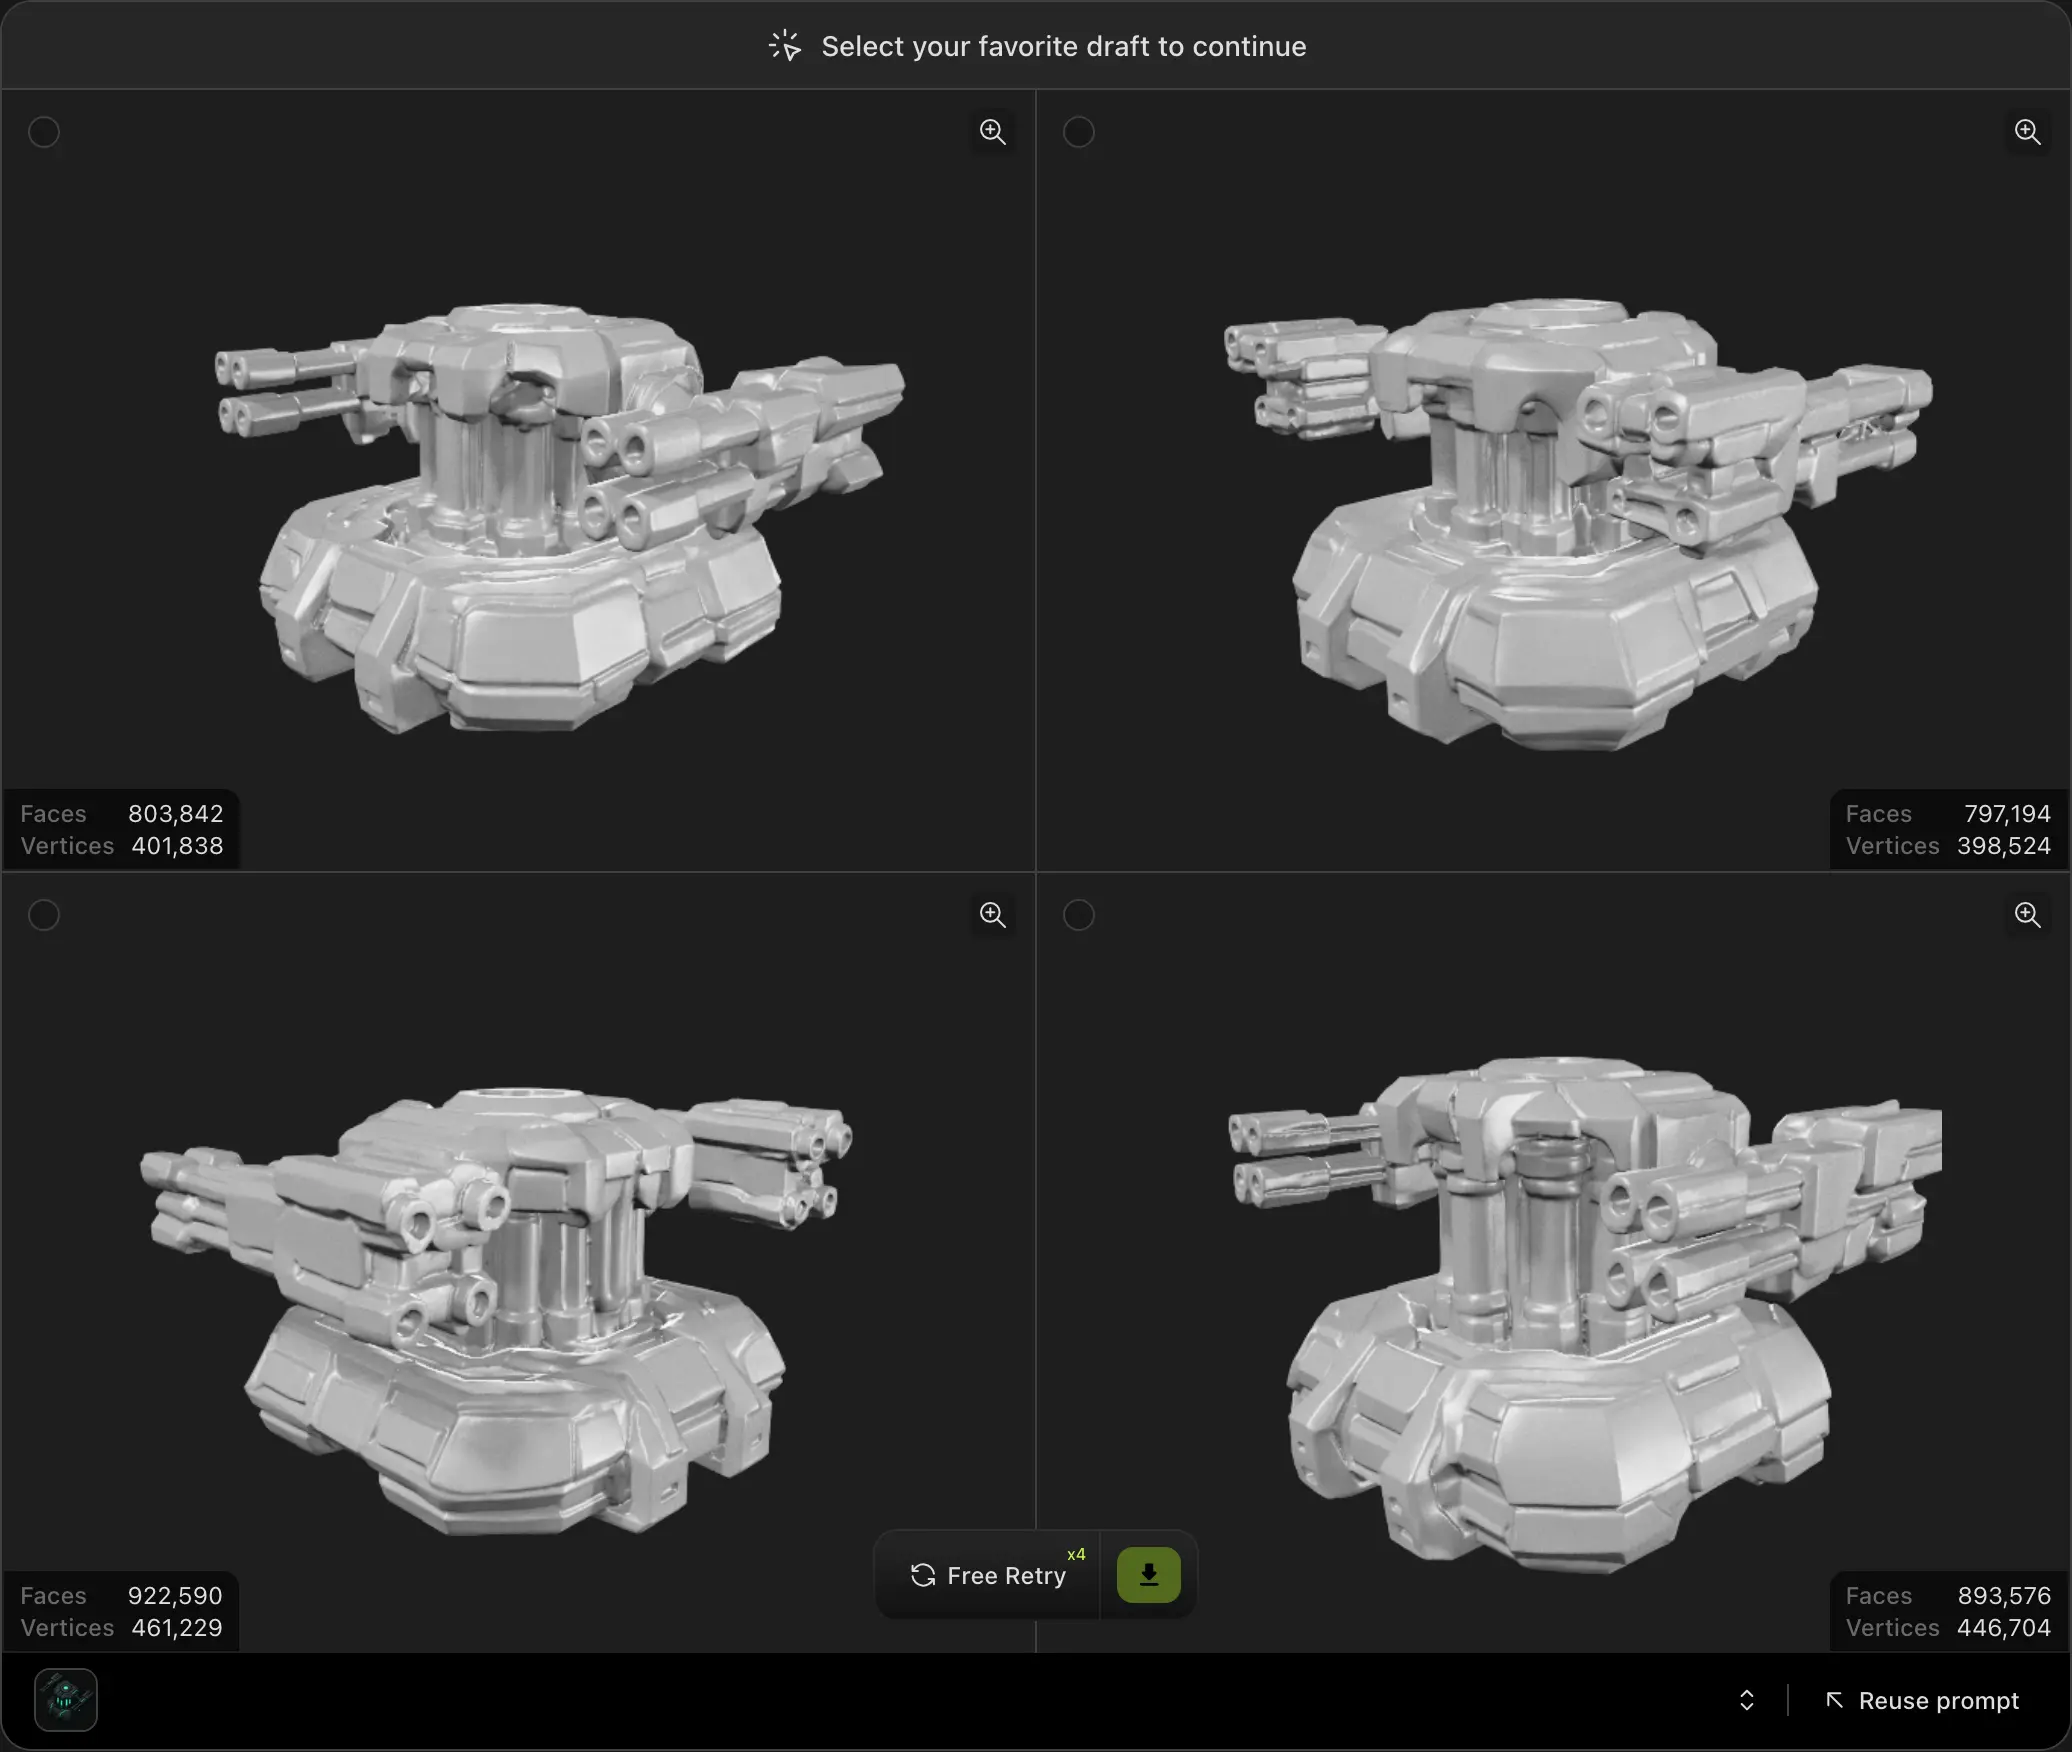
Once you have an image you want to turn into a mesh, the next step is running it through a mesh-generation service. There are several options out there. I've tried a few and had the best results with meshy.ai.
I use meshy.ai's "Image to 3D" workspace with these settings:
- Image: {Asset}
- Name: {AssetName}
- Model Type: Standard
- Model: Meshy 5
- Pose: Off
- License: Private
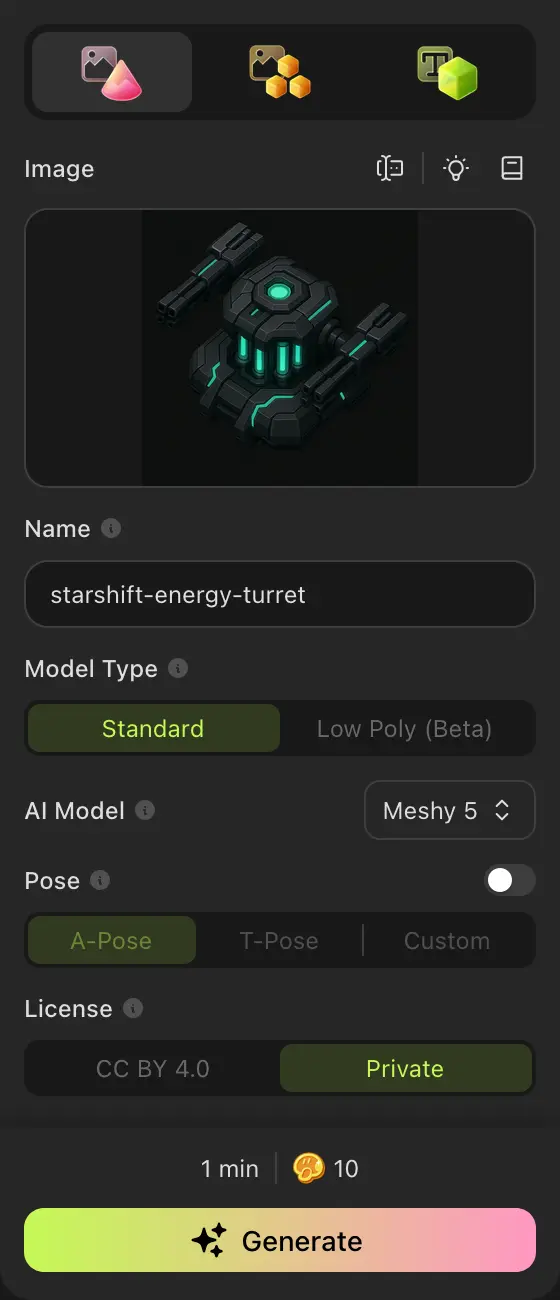
I try to keep the ChatGPT chat name and the meshy.ai asset name the same. Annoyingly, you can't rename a meshy.ai asset after it's created.
I prefer the Meshy 5 model over Meshy 6 because it uses fewer tokens and generates four sample meshes before finalizing one. Being able to choose the best candidate saves time, because mesh quality can vary significantly. I use Meshy 6 occasionally when I can't get good results from Meshy 5.
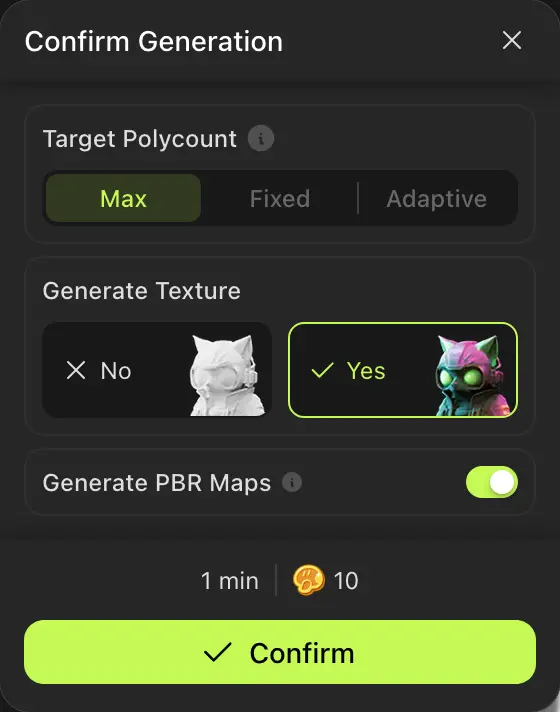
I generate the texture and PBR maps when I pick the final mesh. I don't currently use the PBR maps, but they're free, so I grab them anyway. I use the texture as a starting point when cleaning up the mesh.
If you don't like your results at either stage, meshy.ai allows four free retries per asset. Use those retries to iterate until you get a mesh you're happy with.
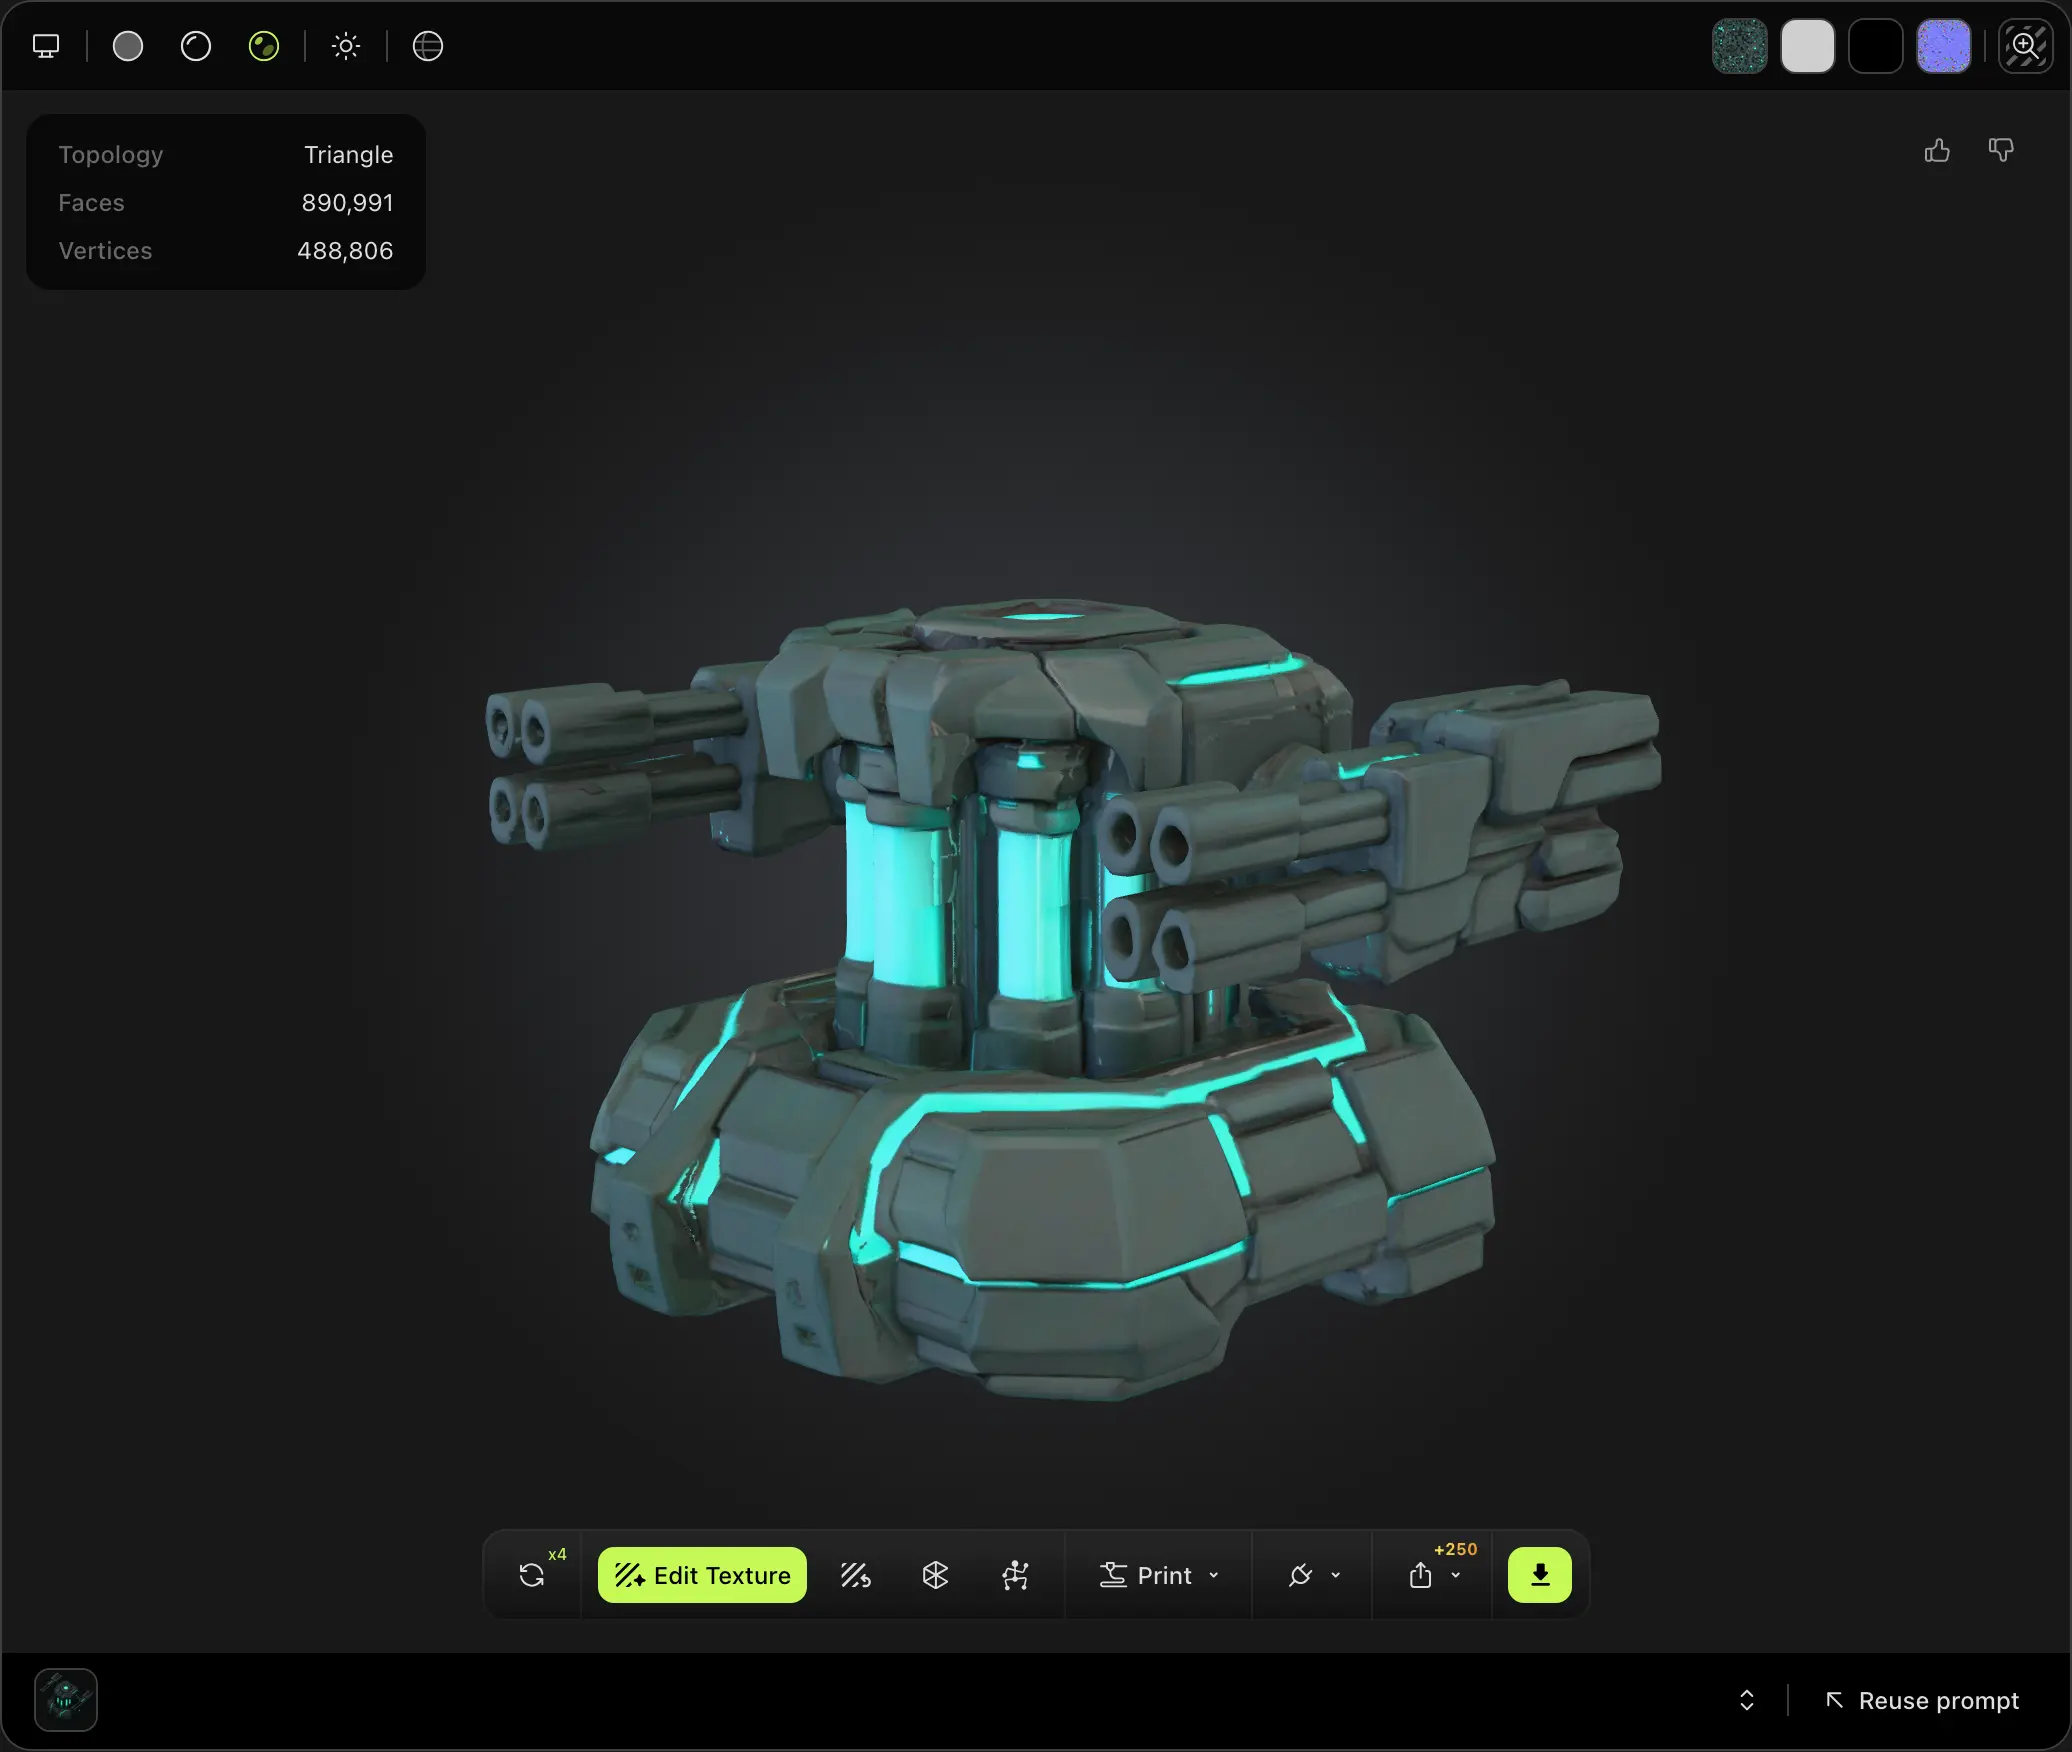
I voxelize the mesh using Voxel Max, and I've found it works best with USDZ files. After meshy.ai finishes a mesh, I click Download and export as USDZ.
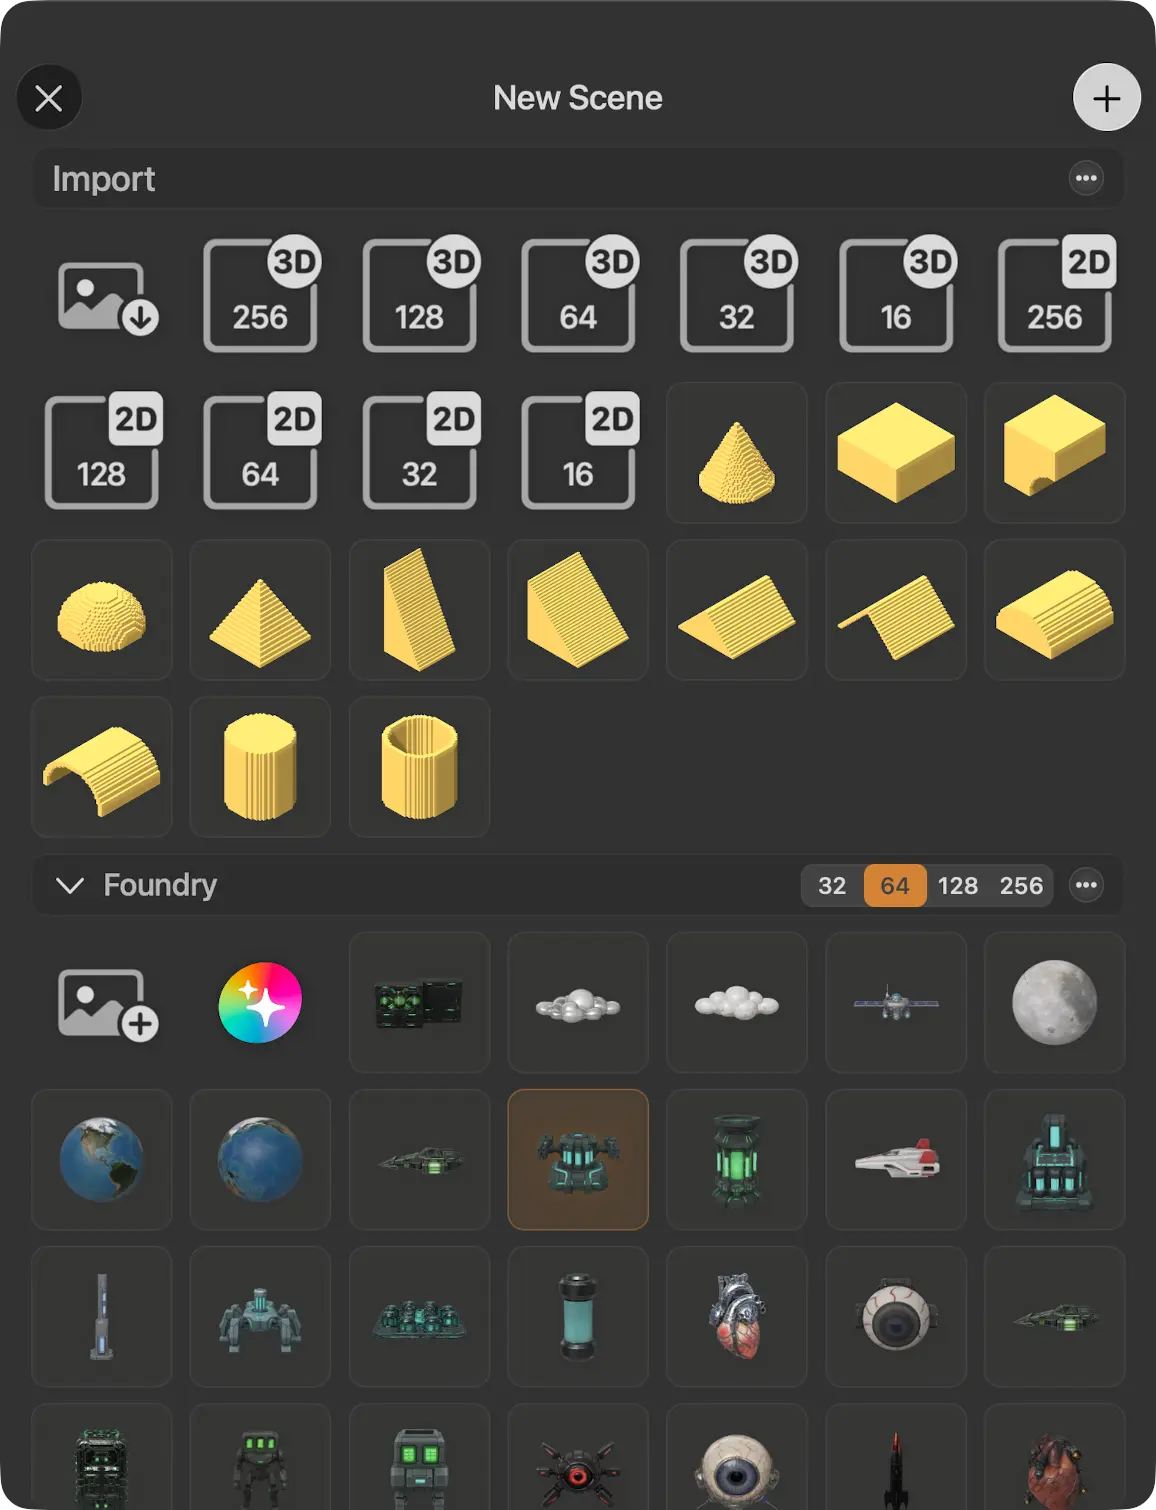
Once you've generated a mesh you're happy with, the next step is to voxelize it and clean it up. There are lots of tools for this, but if you're on Mac, I recommend Voxel Max. It's a great voxel editor that can import meshes, convert them to voxels, and export formats that work well in game engines. It also runs on iOS and supports iCloud sync, which makes it easy to touch up assets with a stylus before doing the final export on a Mac.
Importing is straightforward. Just:
- Create a new scene
- Click the import button in the "Foundry" section
- Select an import size (I recommend 32 or 64)
- Select your mesh file
- Click the confirmation button in the top-right
After import, you'll have a voxelized mesh you can edit and refine.
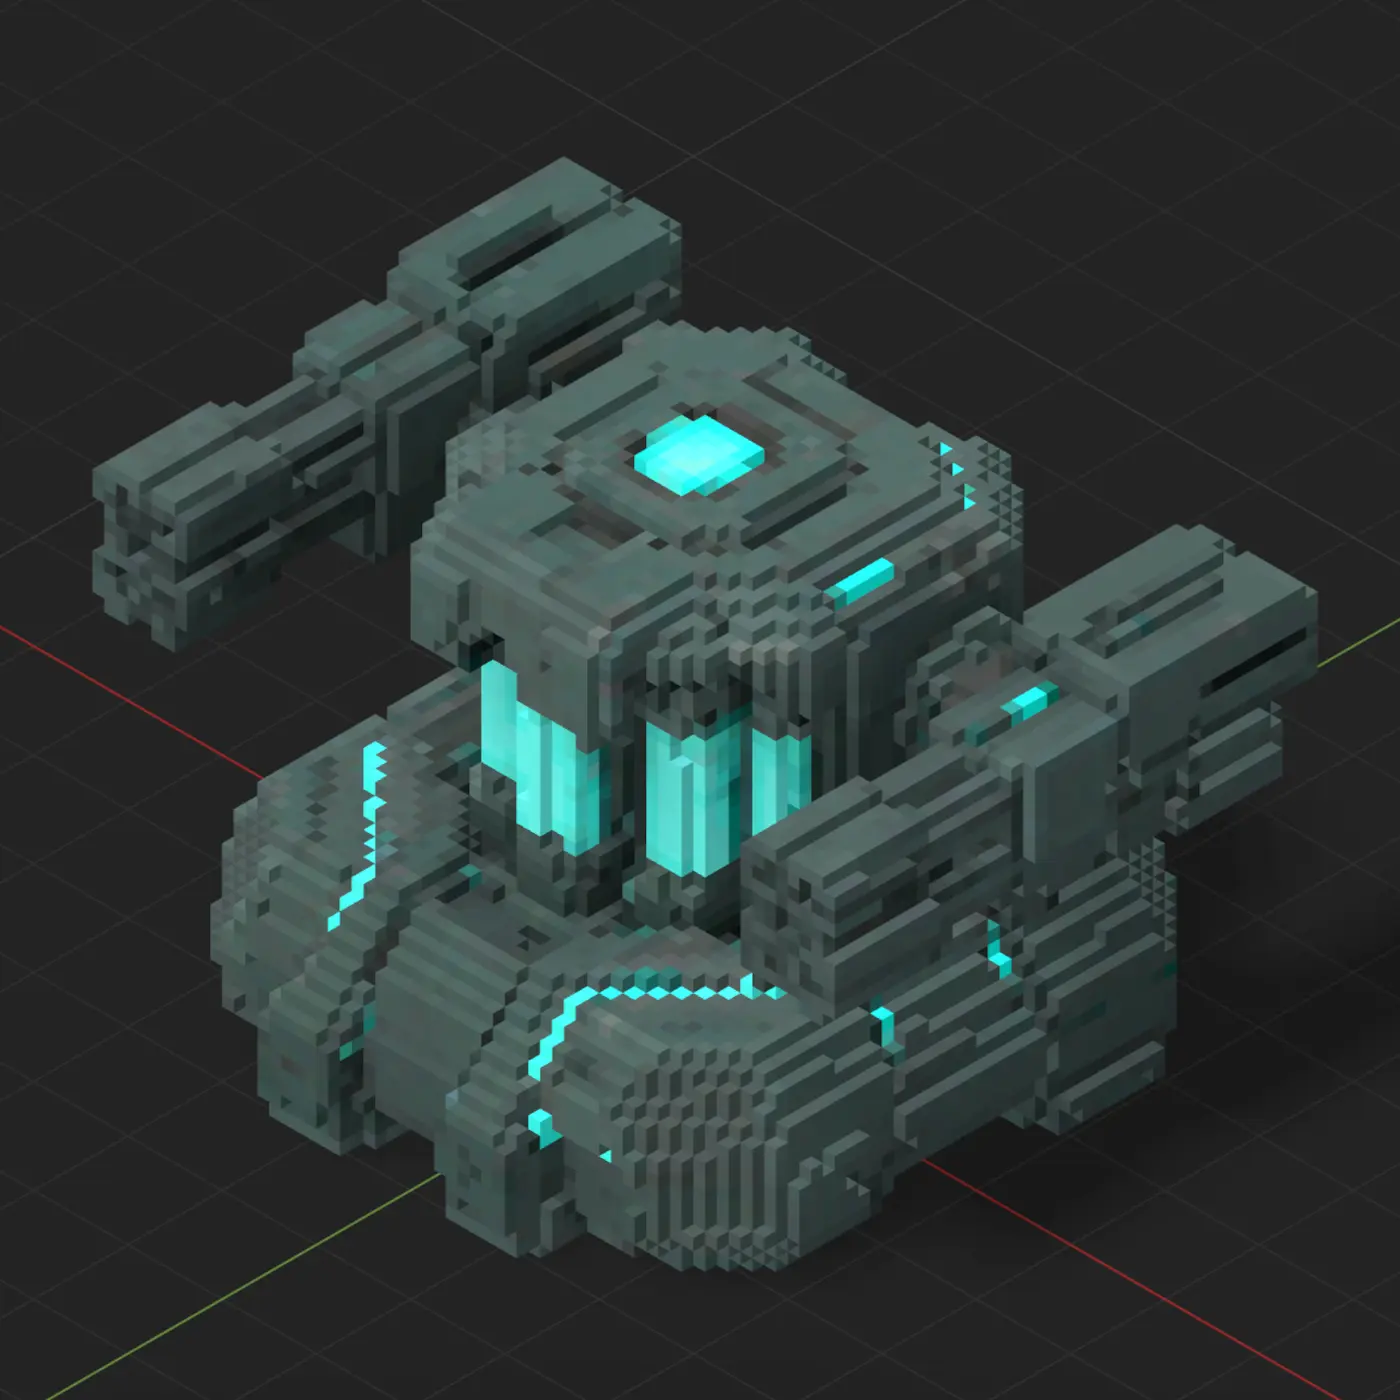
Imported meshes tend to look too realistic for my taste, so I do a style pass. I simplify areas with lots of geometric detail and reduce the color palette for a more cohesive voxel look.
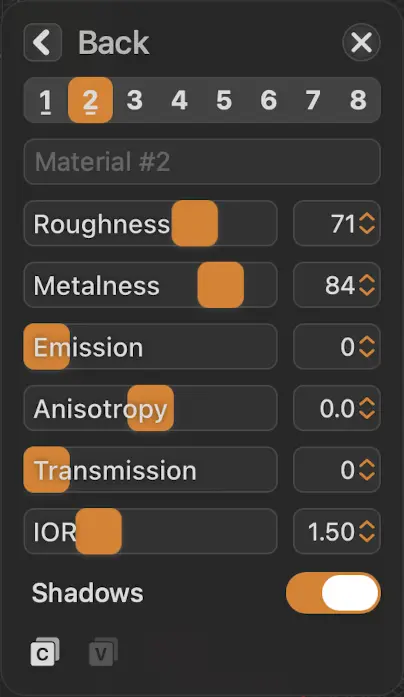
Voxel Max also supports a material workflow with roughness, metalness, and emissive. These values are exported with your mesh and can help generate materials that look great in a game engine.
Once you're happy with the result, export the voxelized mesh as an FBX. Open the hamburger menu in the top-left, choose "Export", then select "Autodesk FBX" and "Save As…".
The FBX exported by Voxel Max can be imported directly into Unity, but I usually do a quick cleanup pass to optimize the mesh and pack material textures.
For this stage of the pipeline, I use my own tooling: tyt. If you want to use tyt, install Rust, then run cargo install tyt --features=bin.
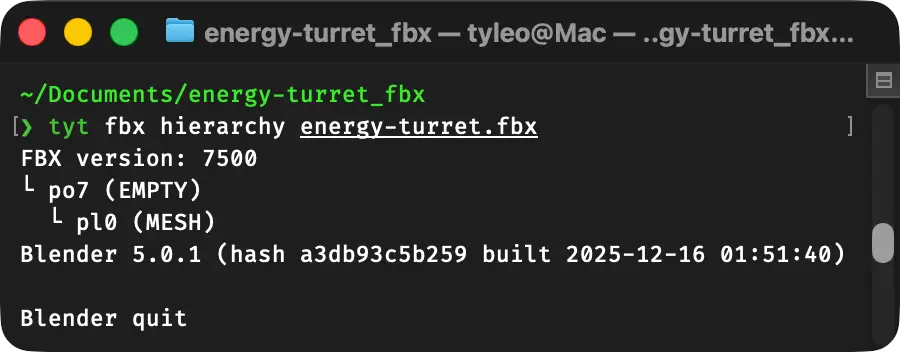
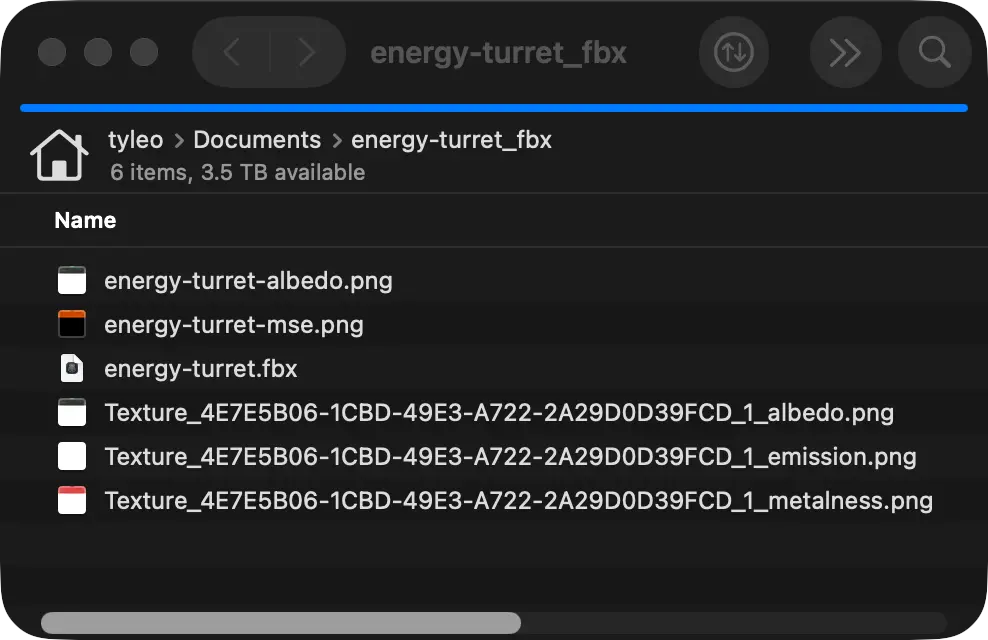
Voxel Max exports your FBX inside a .zip. Unzip it, then navigate to the .fbx file in your terminal. If you inspect the file with tyt fbx hierarchy {MeshName}.fbx, you'll see the mesh nested under a layer of hierarchy. I prefer to flatten the hierarchy and rename the mesh to something Unity-friendly.
You can do that with tyt fbx extract {MeshName}.fbx "*" --output-mesh-name {MeshName}. This replaces the FBX with a cleaned version containing a single mesh and no parents.
If the extract command doesn't match anything, rerun tyt fbx hierarchy {MeshName}.fbx and use a more specific pattern. tyt fbx extract finds mesh names using gitignore syntax. You can replace "*" with an exact name or a narrower pattern if needed.
I also like to remove the default material from my mesh. If you'd like to do this, you can run tyt fbx modify {MeshName}.fbx "*" --clear-materials.
Inside the FBX .zip, you'll also see a few PNG files. These are the textures your mesh uses for color and surface properties. If you plan to use them, it's worth packing them into fewer textures.
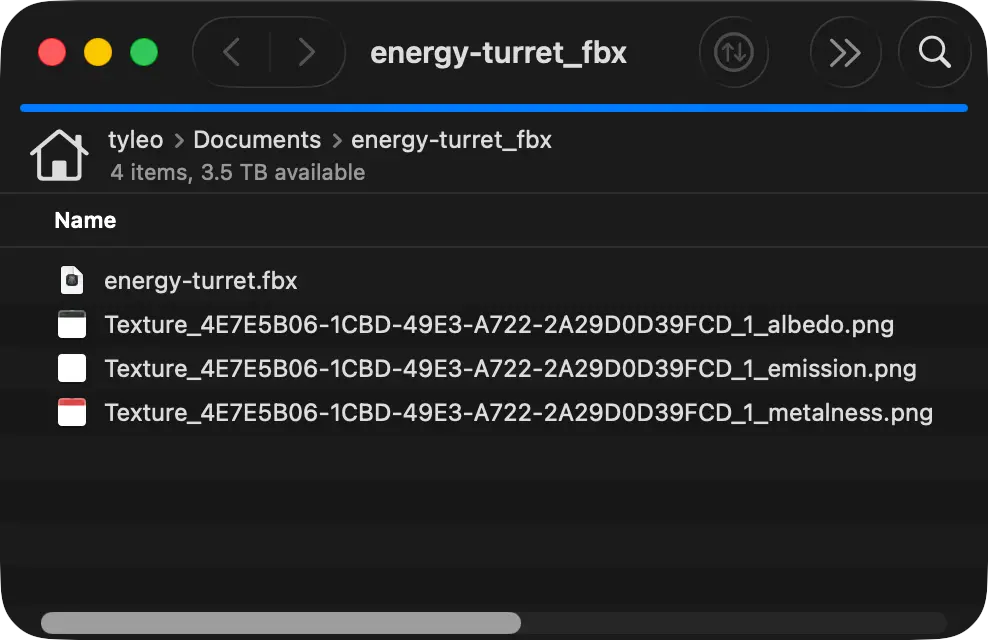
I use this tyt command: tyt material create-mse {MeshName} --combine-metal-rough. This generates an MSE texture (a custom packed map) with channels laid out like this:
- Red: metalness
- Green: smoothness
- Blue: emissive
With that packing, you can drive all three properties from a single texture. Since Unity's standard/URP workflows use smoothness (not roughness), the command also converts the roughness input during packing.
This command also renames the albedo texture (the color) to match the MSE naming: {MeshName}-albedo.png.
With the mesh and materials cleaned up, you can import everything into Unity. Drag these three files into the Project window:
- The FBX
- The albedo texture
- The MSE texture
I prefer creating my own prefabs rather than using Unity's autogenerated ones:
- Right-click the Hierarchy and click Create Empty
- Drag the new GameObject from the Hierarchy into the Project window to create a prefab
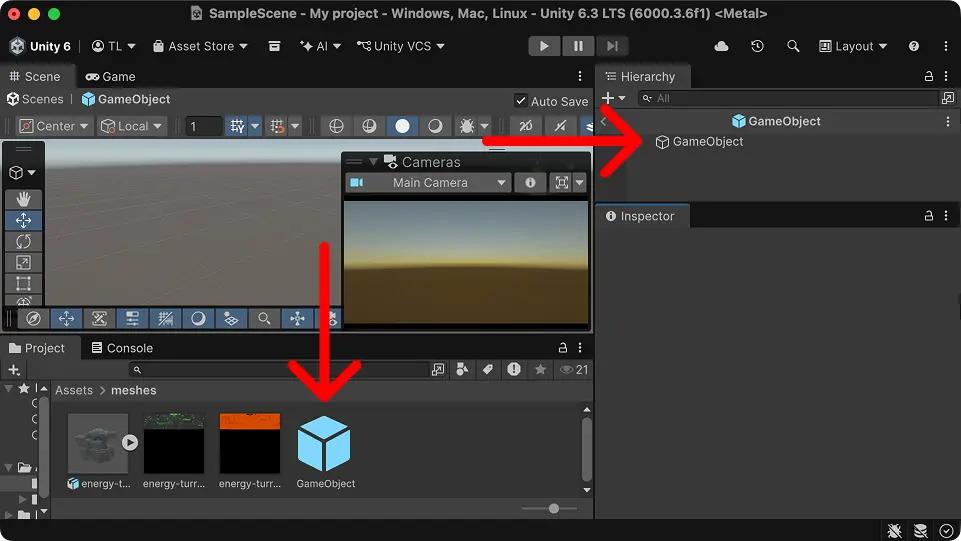
Open the prefab by double-clicking it in the Project window. Then add these components in the Inspector:
- Mesh Filter
- Mesh Renderer
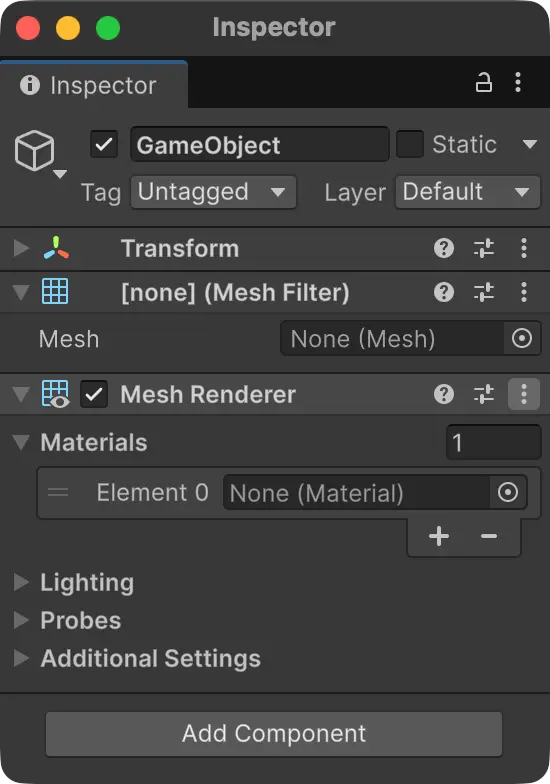
For the Mesh Filter, click the small selector icon on the Mesh field and choose the mesh from your FBX.
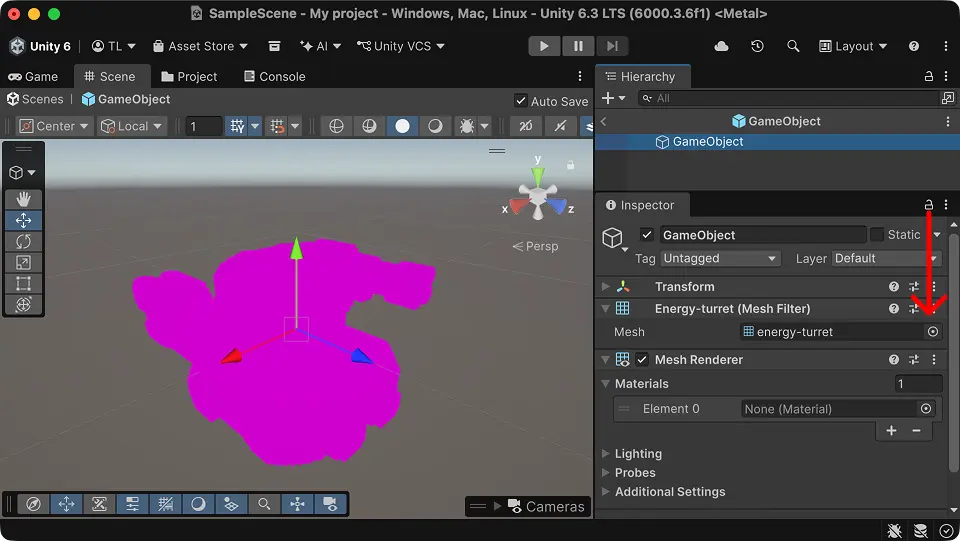
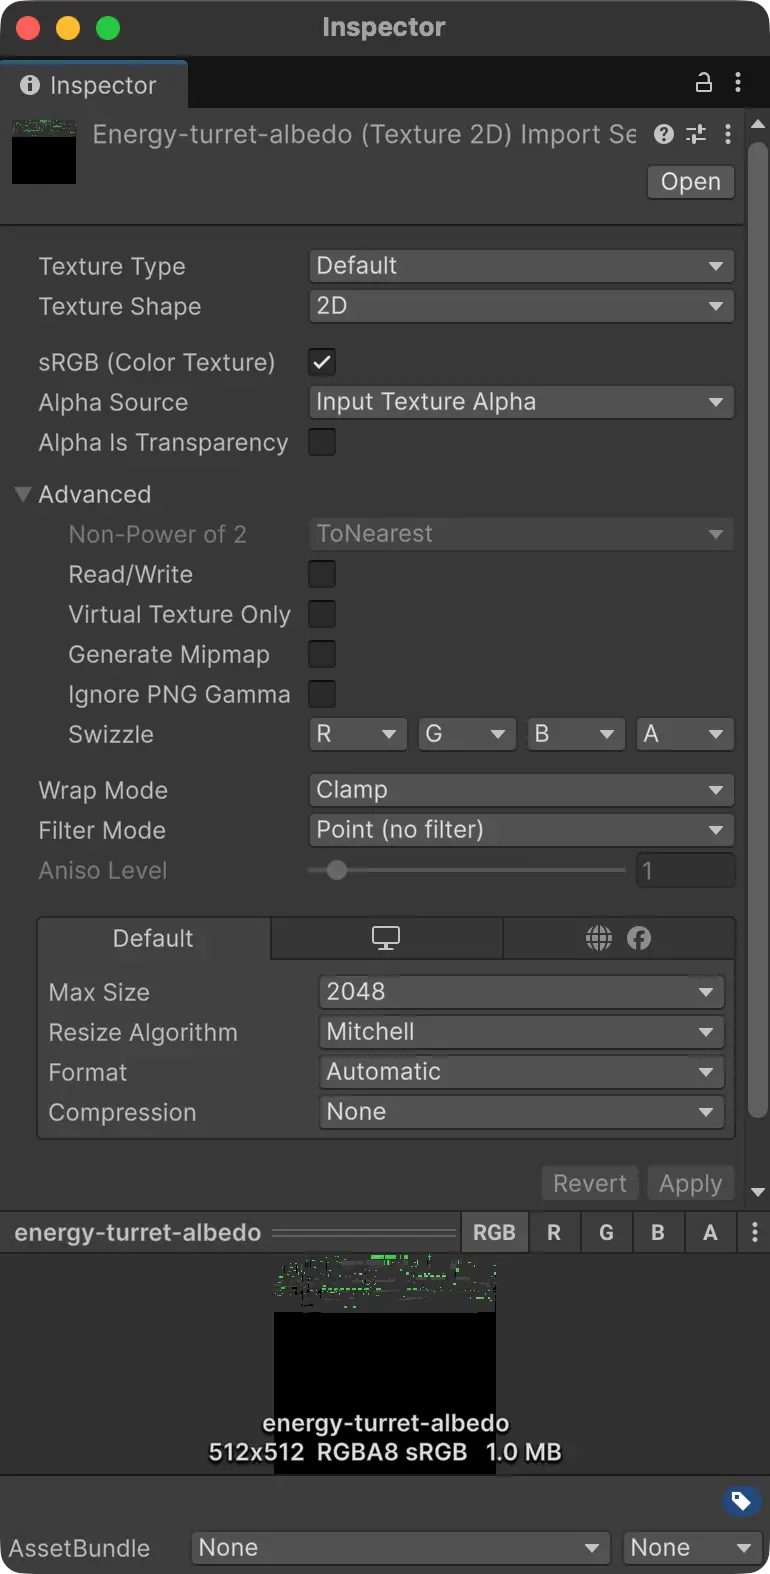
To keep your textures crisp and avoid blurry filtering, adjust their import settings in Unity. Click each texture in the Project window and set the following import settings in the Inspector:
- Generate Mipmap: No
- Wrap Mode: Clamp
- Filter Mode: Point
- Compression: None
For the MSE texture, also uncheck "sRGB (Color Texture)". This prevents gamma correction, which is important since you're using the texture's color channels as data. Keep sRGB enabled for the albedo texture since it represents color.
Once you've made these changes, scroll to the bottom of the Inspector and click "Apply".
You'll need a shader that understands the packed MSE map. I wrote a simple one for Unity's Universal Render Pipeline. Click this link to download it and drag it into Unity. You can double-click it if you'd like to understand how it works or modify it for your needs.
Finally, you'll need a material:
- Right-click in the Project window and select "Create > Material"
- In the material Inspector, open the shader dropdown at the top and choose the "metal-smooth-emissive" shader you imported
- Assign the albedo and MSE textures to their corresponding slots
- Adjust the emissive boost slider to your liking
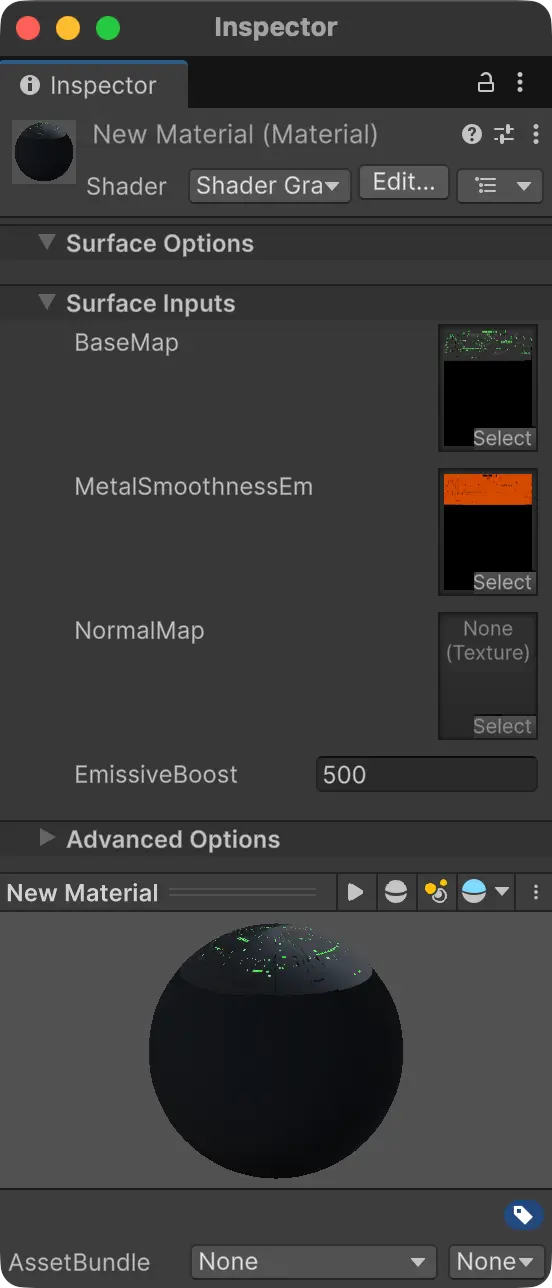
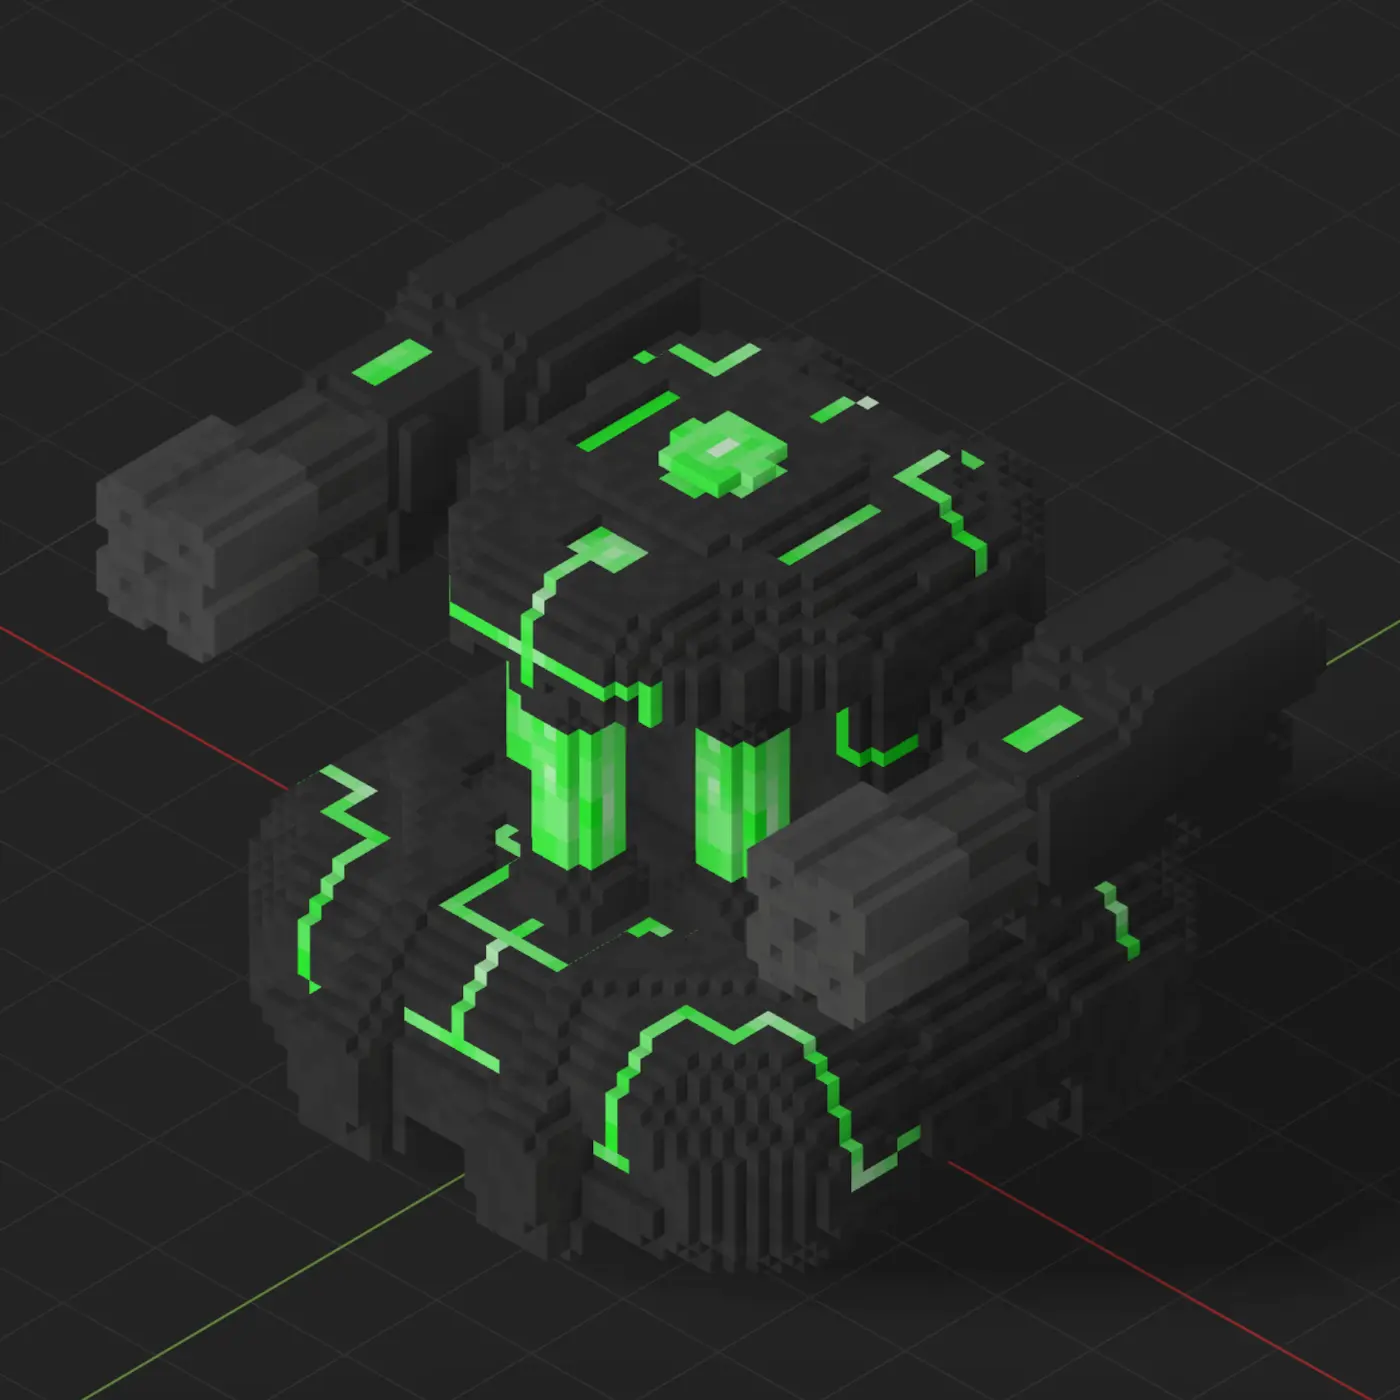
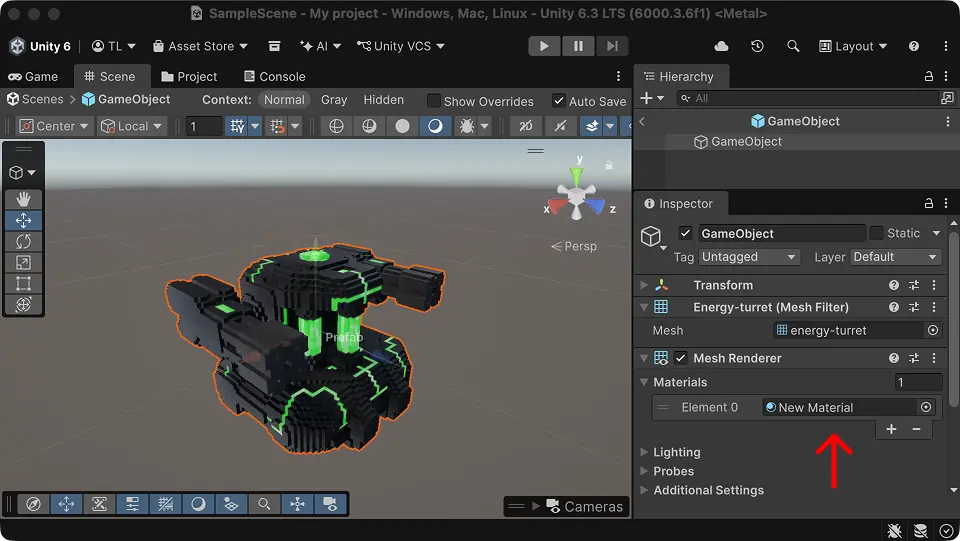
You should see your material come to life in the preview. Finally, assign the material to the Mesh Renderer in your prefab, and you'll see your textured voxel mesh in all its glory. This is the final result, ready to use in games.
This pipeline generates a lot of files, so it's worth setting up a structure to keep things tidy.
I keep all artwork in a source-art repository, separate from my game repository. The game repository only contains the final FBX and packed PNG texture files that ship with the project.
I use GitHub with Git Large File Storage (LFS) to store the large binary files produced by this workflow. Add the following to your .gitattributes to track the common outputs from this pipeline:
123456789101112131415
# Image*.png filter=lfs diff=lfs merge=lfs -text# Meshes*.fbx filter=lfs diff=lfs merge=lfs -text*.usdz filter=lfs diff=lfs merge=lfs -text# Voxel Max*.scndata filter=lfs diff=lfs merge=lfs -text*.vmaxb filter=lfs diff=lfs merge=lfs -text*.vmaxhb filter=lfs diff=lfs merge=lfs -text*.vmaxpsb filter=lfs diff=lfs merge=lfs -text*.vmaxhvsb filter=lfs diff=lfs merge=lfs -text*.vmaxhvsc filter=lfs diff=lfs merge=lfs -text*.vxtex filter=lfs diff=lfs merge=lfs -text
I also keep a scratch directory for intermediate files I don't want to commit. I add it to my .gitignore to avoid accidentally committing it:
1
/scratch
If you're working out of a scratch directory, you can configure tyt to use it by placing a .tytconfig at the root of your repository:
12345
{"fs": {"scratch_dir": "scratch"}}
With that in place, you can run tyt fs move-to-scratch "*.zip" to move all of the ZIP files generated by Voxel Max's FBX exports into the scratch directory at once if you export them alongside your files.
For each asset, I like to store three files in the source-art repository:
- The PNG file generated by ChatGPT
- The VMAX file
- A Markdown file with links to the online sources (ChatGPT + meshy.ai) and local files
I don't store the USDZ files due to their size.
Here's an example asset Markdown file:
1234567
# energy-turret<img src="./energy-turret.png" width=256>1. ChatGPT: [energy-turret](https://chatgpt.com/c/693ec6a9-ad9c-8325-b8a1-65033742b58e)2. meshy.ai: [starshift-energy-turret](https://www.meshy.ai/3d-models/starshiftenergyturret-v2-019b1d44-3c4c-7c4d-9ecc-2037a5242f99)3. Voxel Max: [energy-turret](./energy-turret.vmax)
Keeping everything for an asset in one place makes iteration easy: when I need to revise something, I can jump back into the pipeline at the right step without hunting for links or source files.
That's the pipeline I'm using today to turn low-cost AI meshes into game-ready voxel assets. Once you've got the steps dialed in, you can crank through an entire cohesive set in a session. I'm still iterating on this workflow, and I'll keep updating this page as I learn what works best.